|
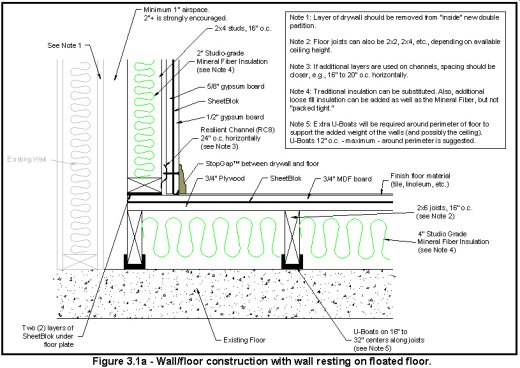
Studio construction began in the summer of 2003. I have 3 children and wanted to record in the evenings while they were sleeping. This would require as much noise isolation as reasonably possible. I found an excellent primer for anyone wanting to build a studio at http://www.acoustics101.com. This is part of the Auralex website (makers of acoustical foam products). Armed this information I began construction. The room was an unfinished attic space measuring approximately 28 x14 feet with 10 foot ceilings which had a/c and had been properly insulated. The room’s ceiling has a slope on one side. I applied acoustical foam in between each 2x4 not already insulated by standard pink insulation. The entire room was then sheeted in drywall. Next I began construction of a new subfloor. The subfloor is basically a frame built out of 2x4’s standing on edge spaced 1 foot apart and braced every 2 feet. Beneath the 2x4’s small rubber U shaped cups called U-boats (made by Auralex, http://www.auralex.com/sound_isolation_uboat/sound_isolation_uboat.asp, were placed every 2 feet. This decouples the subfloor from the rest of the house, reducing vibrations that would carry low frequencies throughout the house. Next, 4 inch thick studio grade mineral fiber insulation was placed in between the studs. The subfloor was then triple sheeted. The first layer was 1/2 particle board which was caulked at each seam. Next a layer of ½ inch drywall laid down. This was placed at 90 degree angles to avoid overlap of seams. Finally a third layer of particle board was laid, again at a 90 degree angle. The subfloor was complete and now it was time to build new walls which would attach to the new subfloor. This would created a room within a room with a 1 to 2 inch airspace in between the new and old walls. The new walls were sheeted back and front and insulated with mineral fiber insulations. Stringers were placed in between the 2x4’s at uneven intervals. In any location where electrical wire needed to go through a wall the holes were carefully caulked. Finally custom double paned windows were ordered and installed. The window in between the control room and isolation room had another piece of ¼ safety glass installed. There is a 2 inch airspace in between the double pane window and the safety glass. Next the room was textured with spayed drywall mud. Lastly the room was painted and carpeted. A very thick carpet padding was used. The diagram above is from Chapter 3 of acoustics 101. |
Vinecrest Audio All rights reserved. |
